This tutorial is about how to login with Google in PHP. Now a day visitors like to login to social site rather than register the account manually. This saves visitor time and they can login securely using social sites. So in this tutorial we are using social site Google to login into website in PHP. How to Login with Google using PHP, MySQLi, and Google OAuth API.
Also Read : Laravel 9 – Drag and Drop file upload using Dropzone
Steps on How to Login with Google in PHP
The following are the steps on how to login with google in PHP:
- Step 1: Files Structure
- Step 2: Get Google OAuth 2.0 Client Secret & the Client ID
- Step 3: Create Files and Folder And Download Google API
- Step 4: Create Database and Table
- Step 5: Create Database Configuration
- Step 6: Create Login, Home, Logout Page
- Step 7: Results
- Step 8: Conclusion
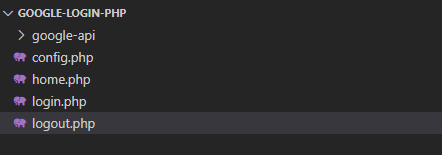
Files Structure
Before starting our tutorial first know the file’s structure of the project.
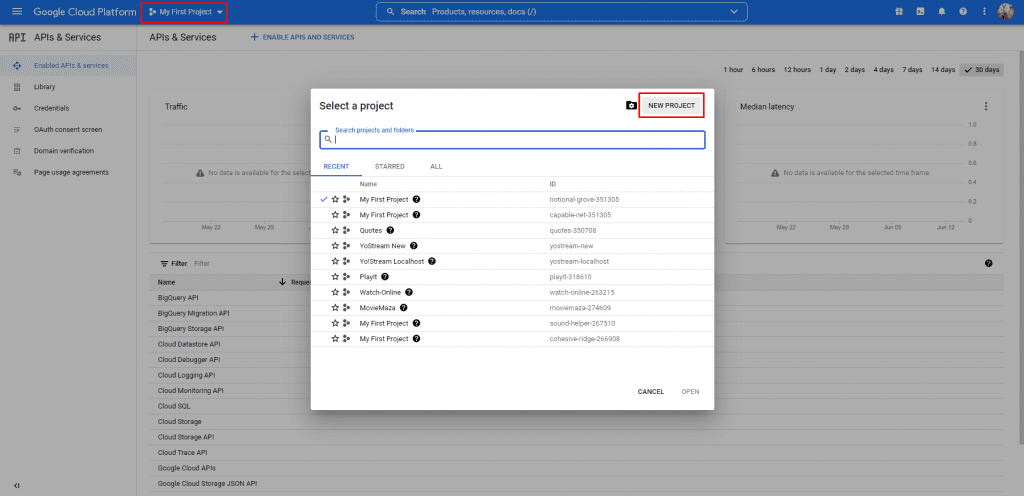
Get Google OAuth 2.0 Client Secret & the Client ID
First, go to the Google API Console and login with your Google account.
Now Create a new Project.
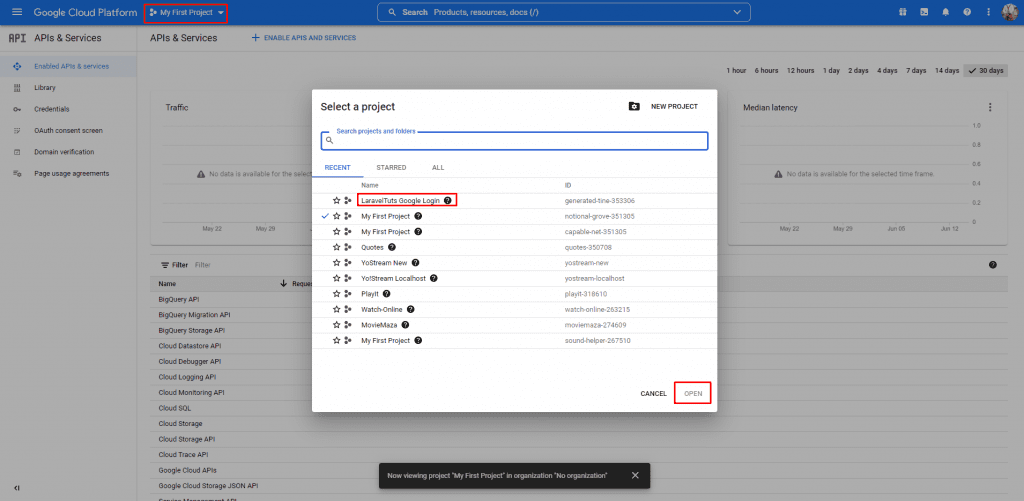
Enter Project name and click Create.

Select Project and Open.
Now go to the credentials and configure the consent screen...
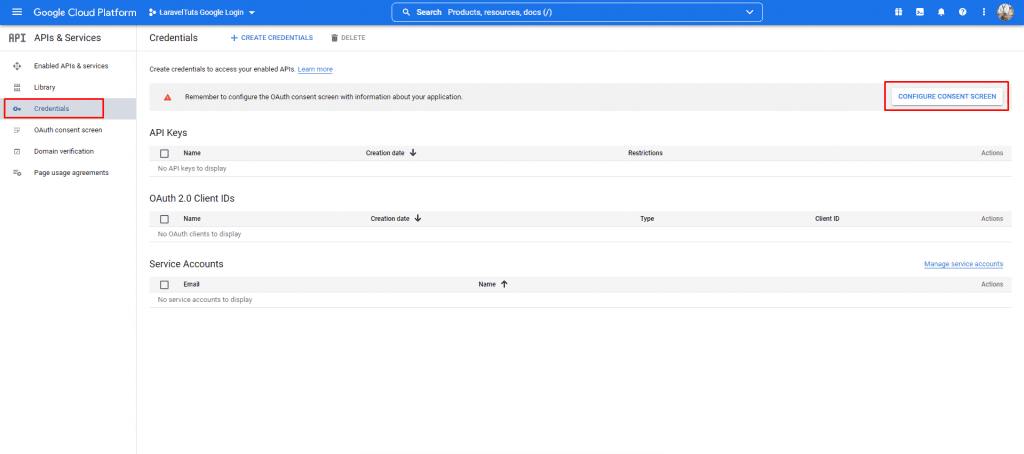
Also Read : How to Send Email using PHPMailer in Laravel 9
Select External and Click Create.

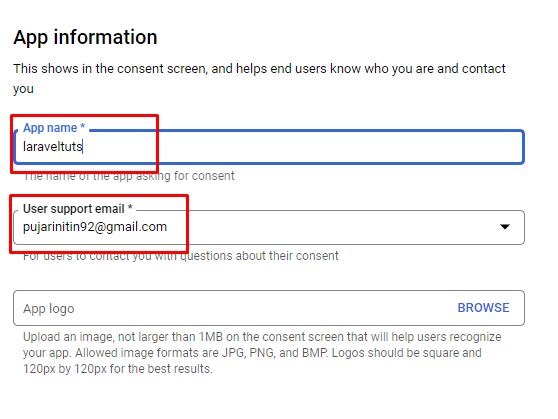
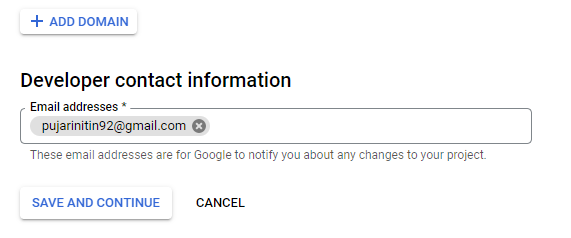
Enter App Name, Support Email, Developer contact information and Save and Continue.
Don’t do anything at the Scopes section, click save and continue.
Add Testing User and Click save and continue.

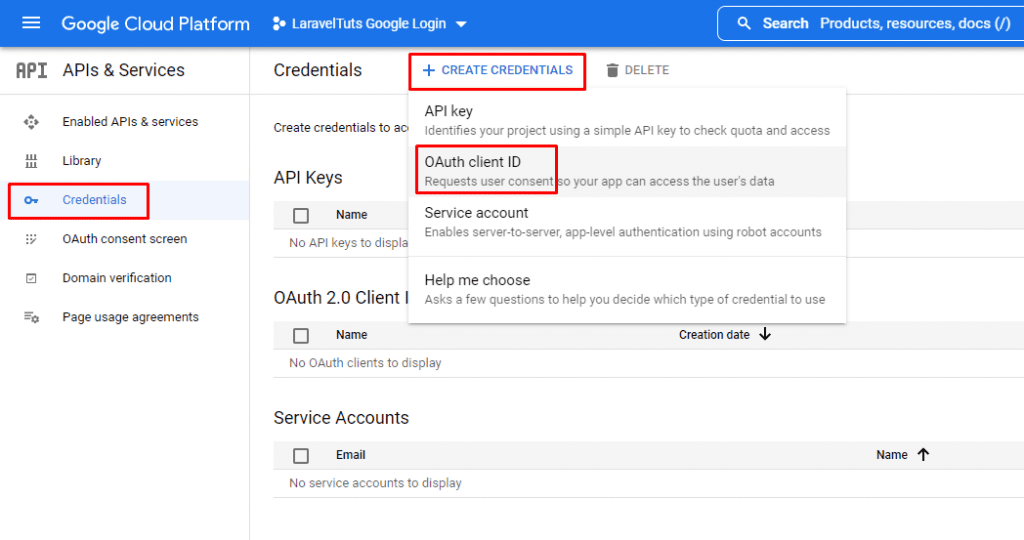
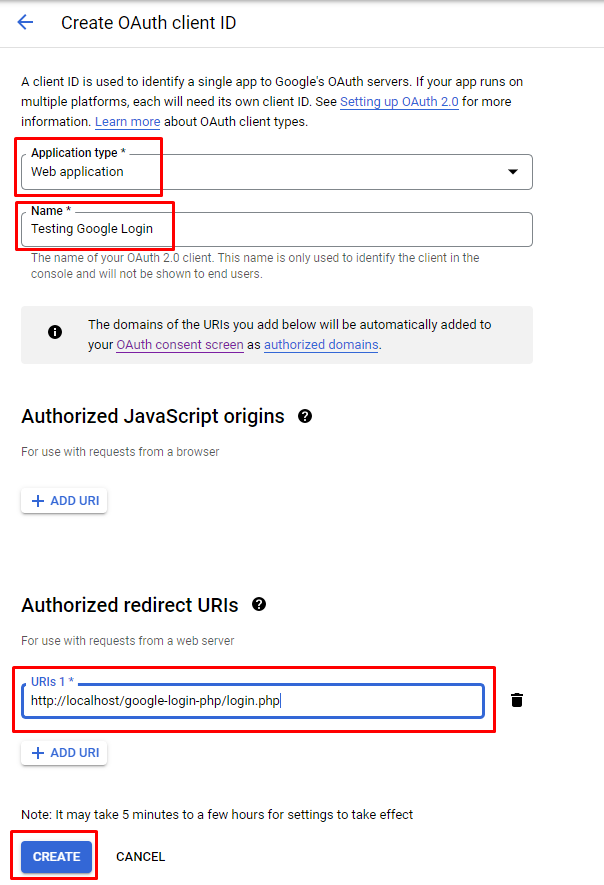
Creating OAuth Credentials
Click Credentials > Create Credentials > OAuth Client ID
Select Application Type, Enter Name, Add Authorized redirect URIs and click Create.
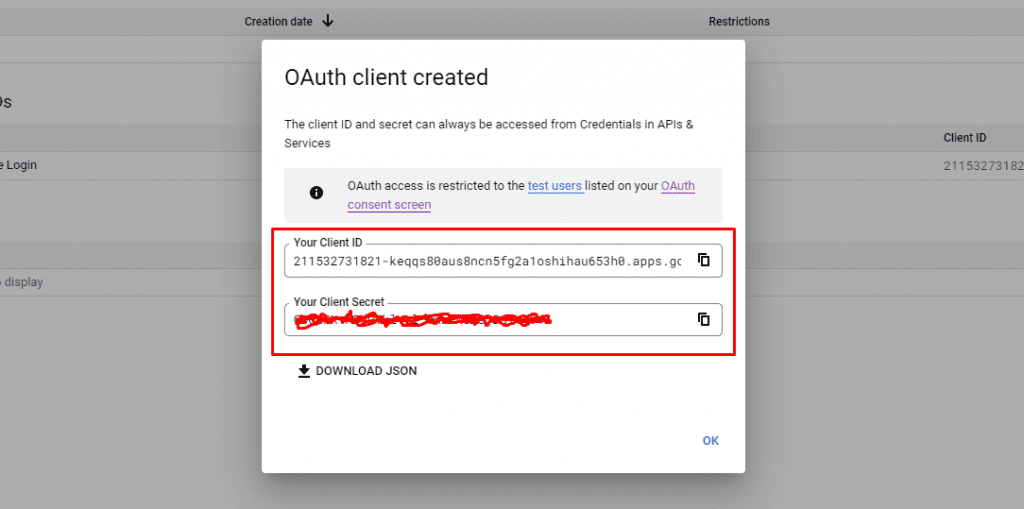
The Client ID and Client secret
Now you have got the client id and client secret, copy them and save elsewhere.
Also Read : How to create Custom Laravel Helpers in Laravel 9
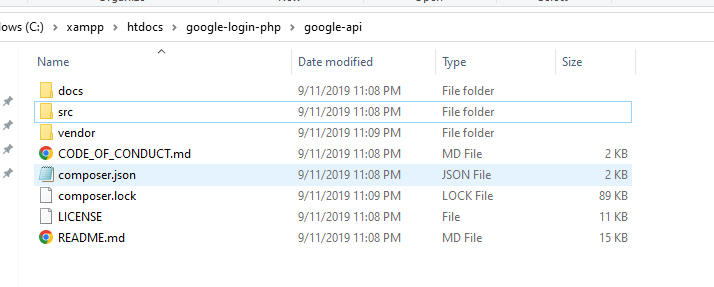
Create Files and Folder And Download Google API
Now it’s time to create a file’s and folder for the project. We are using a Xampp cross-platform web server.
Create a project with name google-login-php in xampp\htdocs
First we will add Google APIs to the project before creating other file’s. So First download the Google APIs
Download the zip file and extract the file to project directory with a name google-api.
Now Create 4 new file’s in the project directory we will add the code to the following file’s later.
- home.php
- login.php
- logout.php
- config.php
Create Database and Table
It’s time to create a database for our project. To create a database open phpmyadmin.
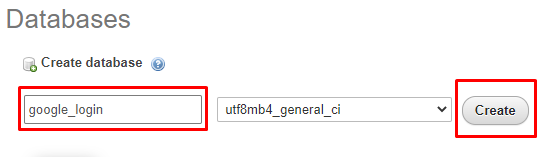
Create a new database with name google_login.
Now we are going to create User’s table. To create a users table run following SQL command:
CREATE TABLE `users` (
 `id` int(11) NOT NULL AUTO_INCREMENT,
 `google_id` varchar(150) COLLATE utf8mb4_unicode_ci NOT NULL,
 `name` varchar(50) COLLATE utf8mb4_unicode_ci NOT NULL,
 `email` varchar(50) COLLATE utf8mb4_unicode_ci NOT NULL,
 `profile_image` text COLLATE utf8mb4_unicode_ci NOT NULL,
 PRIMARY KEY (`id`),
 UNIQUE KEY `google_id` (`google_id`)
) ENGINE=InnoDB DEFAULT CHARSET=utf8mb4 COLLATE=utf8mb4_unicode_ci;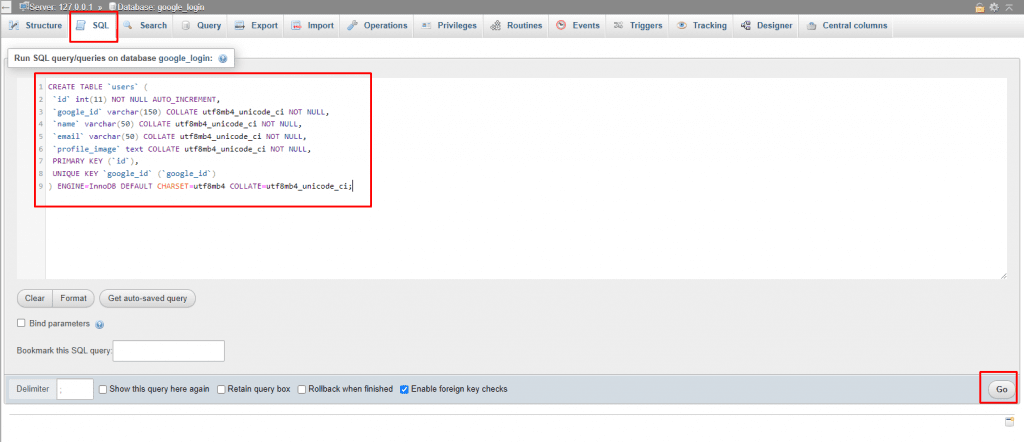
Also Read : Autocomplete Search using jQuery UI in Laravel 9
Create Database Configuration
We had created a config.php file in the project directory. Open the file and insert the following code:
<?php
session_start();
session_regenerate_id(true);
// change the information according to your database
$db_connection = mysqli_connect("localhost","root","","google_login");
// CHECK DATABASE CONNECTION
if(mysqli_connect_errno()){
    echo "Connection Failed".mysqli_connect_error();
    exit;
}
Change database hostname, username, password and database name.
Create Login, Home, Logout Page
Add the following code to the file which we had created earlier.
login.php
<?php
require 'config.php';

if(isset($_SESSION['login_id'])){
    header('Location: home.php');
    exit;
}

require 'google-api/vendor/autoload.php';

// Creating new google client instance
$client = new Google_Client();

// Enter your Client ID
$client->setClientId('add here client id');
// Enter your Client Secrect
$client->setClientSecret('add here client secrect');
// Enter the Redirect URL
$client->setRedirectUri('http://localhost/google-login-php/login.php');

// Adding those scopes which we want to get (email & profile Information)
$client->addScope("email");
$client->addScope("profile");


if(isset($_GET['code'])):

    $token = $client->fetchAccessTokenWithAuthCode($_GET['code']);

    if(!isset($token["error"])){

        $client->setAccessToken($token['access_token']);

        // getting profile information
        $google_oauth = new Google_Service_Oauth2($client);
        $google_account_info = $google_oauth->userinfo->get();

        // Storing data into database
        $id = mysqli_real_escape_string($db_connection, $google_account_info->id);
        $full_name = mysqli_real_escape_string($db_connection, trim($google_account_info->name));
        $email = mysqli_real_escape_string($db_connection, $google_account_info->email);
        $profile_pic = mysqli_real_escape_string($db_connection, $google_account_info->picture);

        // checking user already exists or not
        $get_user = mysqli_query($db_connection, "SELECT `google_id` FROM `users` WHERE `google_id`='$id'");
        if(mysqli_num_rows($get_user) > 0){

            $_SESSION['login_id'] = $id;
            header('Location: home.php');
            exit;

        }
        else{

            // if user not exists we will insert the user
            $insert = mysqli_query($db_connection, "INSERT INTO `users`(`google_id`,`name`,`email`,`profile_image`) VALUES('$id','$full_name','$email','$profile_pic')");

            if($insert){
                $_SESSION['login_id'] = $id;
                header('Location: home.php');
                exit;
            }
            else{
                echo "Sign up failed!(Something went wrong).";
            }

        }

    }
    else{
        header('Location: login.php');
        exit;
    }

else:
    // Google Login Url = $client->createAuthUrl();
?>

<!DOCTYPE html>
<html lang="en">
<head>
    <meta charset="UTF-8">
    <meta name="viewport" content="width=device-width, initial-scale=1.0">
    <meta http-equiv="X-UA-Compatible" content="ie=edge">
    <title>Login - LaravelTuts</title>
    <style>
        *,
        *::before,
        *::after {
            box-sizing: border-box;
            -webkit-box-sizing: border-box;
        }
        body{
            font-family: 'Segoe UI', Tahoma, Geneva, Verdana, sans-serif;
            background-color: #f7f7ff;
            padding: 10px;
            margin: 0;
        }
        ._container{
            max-width: 400px;
            background-color: #ffffff;
            padding: 20px;
            margin: 0 auto;
            border: 1px solid #cccccc;
            border-radius: 2px;
        }
        ._container.btn{
            text-align: center;
        }
        .heading{
            text-align: center;
            color: #4d4d4d;
            text-transform: uppercase;
        }
        .login-with-google-btn {
            transition: background-color 0.3s, box-shadow 0.3s;
            padding: 12px 16px 12px 42px;
            border: none;
            border-radius: 3px;
            box-shadow: 0 -1px 0 rgb(0 0 0 / 4%), 0 1px 1px rgb(0 0 0 / 25%);
            color: #ffffff;
            font-size: 14px;
            font-weight: 500;
            font-family: -apple-system, BlinkMacSystemFont, "Segoe UI", Roboto, Oxygen, Ubuntu, Cantarell, "Fira Sans", "Droid Sans", "Helvetica Neue", sans-serif;
            background-image: url(data:image/svg+xml;base64,PHN2ZyB3aWR0aD0iMTgiIGhlaWdodD0iMTgiIHhtbG5zPSJodHRwOi8vd3d3LnczLm9yZy8yMDAwL3N2ZyI+PGcgZmlsbD0ibm9uZSIgZmlsbC1ydWxlPSJldmVub2RkIj48cGF0aCBkPSJNMTcuNiA5LjJsLS4xLTEuOEg5djMuNGg0LjhDMTMuNiAxMiAxMyAxMyAxMiAxMy42djIuMmgzYTguOCA4LjggMCAwIDAgMi42LTYuNnoiIGZpbGw9IiM0Mjg1RjQiIGZpbGwtcnVsZT0ibm9uemVybyIvPjxwYXRoIGQ9Ik05IDE4YzIuNCAwIDQuNS0uOCA2LTIuMmwtMy0yLjJhNS40IDUuNCAwIDAgMS04LTIuOUgxVjEzYTkgOSAwIDAgMCA4IDV6IiBmaWxsPSIjMzRBODUzIiBmaWxsLXJ1bGU9Im5vbnplcm8iLz48cGF0aCBkPSJNNCAxMC43YTUuNCA1LjQgMCAwIDEgMC0zLjRWNUgxYTkgOSAwIDAgMCAwIDhsMy0yLjN6IiBmaWxsPSIjRkJCQzA1IiBmaWxsLXJ1bGU9Im5vbnplcm8iLz48cGF0aCBkPSJNOSAzLjZjMS4zIDAgMi41LjQgMy40IDEuM0wxNSAyLjNBOSA5IDAgMCAwIDEgNWwzIDIuNGE1LjQgNS40IDAgMCAxIDUtMy43eiIgZmlsbD0iI0VBNDMzNSIgZmlsbC1ydWxlPSJub256ZXJvIi8+PHBhdGggZD0iTTAgMGgxOHYxOEgweiIvPjwvZz48L3N2Zz4=);
            background-color: #4a4a4a;
            background-repeat: no-repeat;
            background-position: 12px 11px;
            text-decoration: none;
        }
        .login-with-google-btn:hover {
            box-shadow: 0 -1px 0 rgba(0, 0, 0, 0.04), 0 2px 4px rgba(0, 0, 0, 0.25);
        }
        .login-with-google-btn:active {
            background-color: #000000;
        }
        .login-with-google-btn:focus {
            outline: none;
            box-shadow: 0 -1px 0 rgba(0, 0, 0, 0.04), 0 2px 4px rgba(0, 0, 0, 0.25), 0 0 0 3px #c8dafc;
        }
        .login-with-google-btn:disabled {
            filter: grayscale(100%);
            background-color: #ebebeb;
            box-shadow: 0 -1px 0 rgba(0, 0, 0, 0.04), 0 1px 1px rgba(0, 0, 0, 0.25);
            cursor: not-allowed;
        }
    </style>
</head>
<body>
    <div class="_container">
        <h2 class="heading">Login</h2>
    </div>
    <div class="_container btn">

        <a type="button" class="login-with-google-btn" href="<?php echo $client->createAuthUrl(); ?>">
            Sign in with Google
        </a>

    </div>
</body>
</html>


<?php endif; ?>
home.php
<?php
require 'config.php';

if(!isset($_SESSION['login_id'])){
    header('Location: login.php');
    exit;
}

$id = $_SESSION['login_id'];

$get_user = mysqli_query($db_connection, "SELECT * FROM `users` WHERE `google_id`='$id'");

if(mysqli_num_rows($get_user) > 0){
    $user = mysqli_fetch_assoc($get_user);
}
else{
    header('Location: logout.php');
    exit;
}
?>
<!DOCTYPE html>
<html lang="en">
<head>
    <meta charset="UTF-8">
    <meta name="viewport" content="width=device-width, initial-scale=1.0">
    <meta http-equiv="X-UA-Compatible" content="ie=edge">
    <title><?php echo $user['name']; ?> - LaravelTuts</title>
    <style>
        *,
        *::before,
        *::after {
            box-sizing: border-box;
            -webkit-box-sizing: border-box;
        }
        body{
            font-family: 'Segoe UI', Tahoma, Geneva, Verdana, sans-serif;
            background-color: #f7f7ff;
            padding: 10px;
            margin: 0;
        }
        ._container{
            max-width: 400px;
            background-color: #ffffff;
            padding: 20px;
            margin: 0 auto;
            border: 1px solid #cccccc;
            border-radius: 2px;
        }
        .heading{
            text-align: center;
            color: #4d4d4d;
            text-transform: uppercase;
        }
        ._img{
            overflow: hidden;
            width: 100px;
            height: 100px;
            margin: 0 auto;
            border-radius: 50%;
            box-shadow: 0 10px 15px -3px rgba(0, 0, 0, 0.1), 0 4px 6px -2px rgba(0, 0, 0, 0.05);
        }
        ._img > img{
            width: 100px;
            min-height: 100px;
        }
        ._info{
            text-align: center;
        }
        ._info h1{
            margin:10px 0;
            text-transform: capitalize;
        }
        ._info p{
            color: #555555;
        }
        ._info a{
            display: inline-block;
            background-color: #E53E3E;
            color: #fff;
            text-decoration: none;
            padding:5px 10px;
            border-radius: 2px;
            border: 1px solid rgba(0, 0, 0, 0.1);
        }
    </style>
</head>
<body>
    <div class="_container">
        <h2 class="heading">My Account</h2>
    </div>
    <div class="_container">
        <div class="_img">
            <img src="<?php echo $user['profile_image']; ?>" alt="<?php echo $user['name']; ?>">
        </div>
        <div class="_info">
            <h1><?php echo $user['name']; ?></h1>
            <p><?php echo $user['email']; ?></p>
            <a href="logout.php">Logout</a>
        </div>
    </div>
</body>
</html>
logout.php
<?php
// Initialize the session.
// If you are using session_name("something"), don't forget it now!
session_start();

// Unset all of the session variables.
$_SESSION = array();

// If it's desired to kill the session, also delete the session cookie.
// Note: This will destroy the session, and not just the session data!
if (ini_get("session.use_cookies")) {
    $params = session_get_cookie_params();
    setcookie(session_name(), '', time() - 42000,
        $params["path"], $params["domain"],
        $params["secure"], $params["httponly"]
    );
}

// Finally, destroy the session.
session_destroy();
header("Location: login.php");
exit;
?>
Run the project by following URL:
http://localhost/google-login-php/login.phpAlso Read : Laravel 9 Sorting Columns with Pagination
Results

Conclusion
Today we had learned How to Login with Google in PHP with Google Apis. Hope this tutorial helps you. If you have any trouble with the tutorial you can comment down below.
Also Read : How to Create a Login Form in PHP Example